Replacing the vacuum pump in a heavy-duty lift is vital for optimal performance. A well-functioning vacuum pump ensures safety and efficiency in various lifting tasks. However, many operators may feel overwhelmed by the process. This guide aims to simplify that experience.
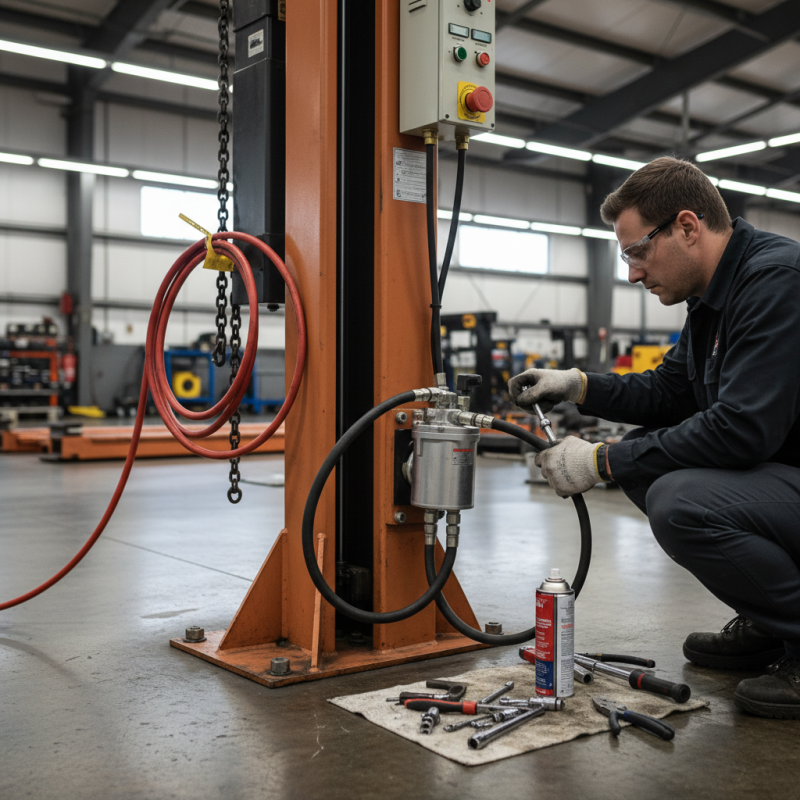
When asking, "How to replace the vacuum pump in a heavy-duty lift?", start by gathering your tools and reviewing the lift's manual. Understanding your specific model is essential. You may face challenges along the way. For instance, bolts might be rusted or hard to access. It may require extra effort or creative solutions.
You need to approach this task with diligence. Take safety precautions seriously. It is critical to disconnect power and relieve any pressure in the system. The right preparation can prevent errors that lead to costly mishaps. This approach not only enhances your skills but contributes to reliable lift operations.
Vacuum pumps play a critical role in heavy-duty lifts. They create a vacuum that allows the lift to operate smoothly and efficiently. According to industry reports, a properly functioning vacuum pump can enhance the lift's lifting capacity by up to 30%. This efficiency directly impacts operational costs, making regular maintenance vital.
Over time, vacuum pumps can wear out or fail. Signs of wear may include unusual noises or decreased lifting performance. Data from maintenance logs indicate that 70% of lift failures are linked to vacuum pump issues. If replaced timely, operators can minimize downtime and maintain safety standards.
Understanding vacuum pump technology is essential. Not all pumps are the same, and choosing the appropriate type is crucial for specific lift systems. Some pumps may seem adequate at first glance, but they might not provide long-term reliability. Continuous monitoring and proper selection can lead to increased productivity and lower operational risks.
Elevator systems are essential in many heavy-duty environments, and vacuum pumps play a crucial role in their operation. Identifying signs of a failing vacuum pump can prevent costly downtime. A study indicates that about 30% of elevator malfunctions are tied to pump failures.
Common signs of a failing vacuum pump include unusual noises, inconsistent performance, and frequent system failures. For instance, if the pump makes a grinding or rattling sound, it could indicate mechanical issues. A decrease in lift speed is another red flag. According to the American Society of Mechanical Engineers, maintaining optimal vacuum pressure is vital for efficiency. If users notice a significant drop, inspection is critical.
Regular monitoring can save time and money. Operators should track performance metrics and listen for abnormal sounds. While some minor issues may not require immediate action, it is wise to document them. Over time, neglecting these signs can lead to more severe complications. Understanding these warning signs is essential for maintaining reliable elevator systems.
When preparing for a vacuum pump replacement in heavy-duty lifts, ensuring safety is paramount. Start by gathering essential tools like wrenches, pliers, and safety goggles. A well-lit workspace is crucial for visibility. Always check for any leaks or damage before starting. Remember to have a disposal plan for old parts.
Safety measures cannot be overlooked. Always wear protective gear when working. Ensure the lift is secure and powered off to prevent accidents. A first aid kit should be nearby in case of emergencies. Regularly inspect your tools for wear and tear to maintain safety standards. Undamaged equipment translates to a safer working environment.
Tips: Double-check the lift's manual for specific instructions related to your model. Document the original setup with photos before removal. This can help during reinstallation. Engage a second person if possible. Teamwork can mitigate risks and lead to a smoother process. Recognize the importance of taking breaks to stay focused. Replacing heavy equipment can be taxing, and fatigue leads to mistakes.
Replacing a vacuum pump in heavy-duty lifts is essential for optimal performance. To begin, gather appropriate tools like wrenches, screwdrivers, and a vacuum gauge. Secure your work area, ensuring safety precautions are in place.
Start by disconnecting the power supply. Removing electrical connections can be tricky. Label each wire before disconnecting to avoid confusion later. Carefully unscrew the vacuum pump from its mount. Pay attention to any seals or gaskets; they may need replacing too.
Tips: Always wear safety goggles during this process. Dust and residual oil can obscure your vision. Treat old parts with care, as they might be fragile.
Once the old pump is out, inspect the surrounding area for wear or damage. Clean the mounting surface before installing the new pump. Ensure alignment and tighten all screws firmly without over-torquing. Each step is critical for the pump's longevity. Double-check connections and seals to prevent leaks.
Tips: Keep a checklist handy to monitor your progress. A small oversight can lead to bigger issues down the road. Document any unusual findings during removal; they can be useful for diagnostics later on.
| Step Number | Description | Tools Required | Time Estimate |
|---|---|---|---|
| 1 | Safety First: Disconnect all power sources to the lift. | Safety gloves, goggles | 15 minutes |
| 2 | Access the vacuum pump area by removing any necessary panels or covers. | Screwdriver set, socket wrench | 30 minutes |
| 3 | Disconnect the hoses and electrical connectors from the old vacuum pump. | Pliers, electrical tape | 20 minutes |
| 4 | Unscrew and remove the old vacuum pump from its mounting. | Socket wrench | 25 minutes |
| 5 | Install the new vacuum pump by reversing the disassembly steps. | Socket wrench, screwdriver set | 40 minutes |
| 6 | Reconnect all hoses and electrical connections securely. | Pliers, electrical tape | 15 minutes |
| 7 | Replace all panels and covers, ensuring everything is secure. | Screwdriver set | 20 minutes |
| 8 | Reconnect the power and test the new vacuum pump. | N/A | 10 minutes |
When installing a new vacuum pump in heavy-duty lifts, attention to detail is critical. Research shows that improper installation can lead to a 30% increase in system inefficiency. Begin by ensuring that the work area is clean. This reduces contamination risks during installation. Assemble all necessary tools and parts beforehand. This way, you can maintain focus on the task at hand.
Tip: Always check for compatibility between the new pump and existing lift components. Mismatched components can lead to premature failure. Studies indicate that about 20% of pump issues arise from incorrect fittings. After installation, conduct thorough testing. Monitor for unusual vibrations or sounds, as these can signal underlying issues.
Remember, the quality of the installation can significantly impact performance. Regular maintenance schedules should be established to ensure longevity. Many industry experts recommend replacing vacuum pumps every five years to prevent unexpected malfunctions. However, keep in mind that each system is unique; tailored maintenance plans can yield better results. Assess performance metrics regularly to identify signs of wear early on.
: Essential tools include wrenches, pliers, and safety goggles.
Always wear protective gear and secure the lift. Make sure it’s powered off.
Look for leaks or damage in the pump and surrounding area.
Good lighting improves visibility, reducing the risk of mistakes.
Label each wire before removing electrical connections.
Handle them with care to prevent breakage.
Photos help during reinstallation and ensure correct placement.
Take regular breaks to avoid fatigue, which can lead to mistakes.
Regular inspections prevent accidents and ensure a safer work environment.
Minor oversights can lead to bigger issues down the line.
To address the question of "How to replace the vacuum pump in a heavy-duty lift?", it's essential to first understand the crucial role vacuum pumps play in elevator systems. These components are responsible for creating the necessary vacuum that facilitates the lift’s smooth operation. Recognizing the signs of a failing vacuum pump, such as decreased performance or unusual noises, is the first step toward ensuring safety and productivity.
Preparation is key when it comes to replacing a vacuum pump. Gather the necessary tools and ensure all safety measures are in place. The replacement process involves carefully removing the old pump and installing a new one, adhering to best practices and industry standards. Following a detailed step-by-step guide can simplify this task, ultimately enhancing the lift's efficiency and reliability.
Bendo Lift